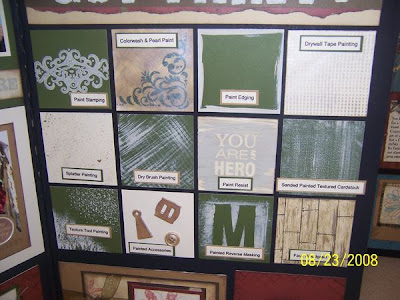
1-Paint Stamping-Create a desired shade of paint using re-inkers and apply the paint using the foam brush on the stamp while on the acrylic block. Stamp onto your project being careful to use a down and up motion, as the paint will cause the stamp to slide.
2-Colorwashing with Pearl Paint-Squeeze Create-A-Shade Pearl Paint on to a paint tray and mix with re-inker to add color. Stamp an image on your cardstock and sponge ink around the edges of your cardstock. Paint in a crosshatch motion over the entire piece of cardstock giving it a colorwashed effect. Let dry and embellish!
3-Paint Edging-Using either type of paint mixed to the desired shade, take a round sponge, dip in the paint, and swipe the edges of your cardstock. Allow to dry before adhering to your project.
4-Paint Resist-Stamp an image with the Versamark ink pad and heat emboss with Clear powder. Next, mix the desired shade of paint for your project. Using the Flat Nylon Brush, dip into paint, and paint in a back and forth motion over the embossed image. Quickly take a paper towel and rub off the paint from the embossed design.
5-Texture Tool Painting-Using either type of paint mixed to the desired shade, take one of the Texture Tools, dip in the paint, and distress your cardstock. Each texture tool will give a completely different result.
6-Drywall Tape Painting-Cover your desired project with drywall tape. Using either paint mixed to the desired shade, take the foam paintbrush and softly brush over the drywall tape. Remove drywall tape from project creating a neat textured background.
7-Dry Brush Painting-Using either paint mixed to the desired shade, take the fan paintbrush and dip into the paint. Brush on to scratch paper first and then on to your cardstock to give a dry brushed effect.
8-Painted Accessories-Using either paint mixed to the desired shade, take the foam brush and paint Close To My Heart accessories to match your layout and projects. Try painting our Dimensional Elements, buttons, Just Blooms, and even metal accessories.
9-Faux Woodgrain-Mix a drop of Ceramcoat Paint with Desert Sand Re-Inker using many drops of re-inker. Take an old toothbrush, dip into paint, and swipe across cardstock in a back and forth motion. Next, softly sponge with Desert Sand ink over cardstock to fill in any areas missed by toothbrush. Using a Black My Legacy Writer and a ruler, draw lines over the painted surface to resemble wood grain.
10-Sanded Painted Textured Cardstock-Using either paint mixed to the desired shade, take the flat brush and paint over the textured cardstock. Once completely dry, try sanding the textured cardstock for a new distressed look.
11-Painted Reverse Masking-Stamp and cut out your image or letters. Tape the image or letters down to your project using repositionable adhesive. Using either paint mixed to the desired shade, take the flat brush and paint over the image or letters. Remove the taped letters or image to create the masked effect.
12-Splatter Painting-Using either type mixed to the desired shade, take the flat, fan, or toothbrush and dip into paint. Using your finger flick the bristles of the brush resulting in a splatter effect of the paint on to your project.
Created by Kristy Schoon
No comments:
Post a Comment